Restoring Strength And Style Through Smart Siding Repair Techniques

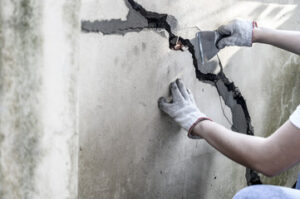
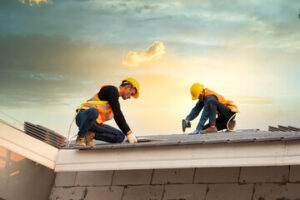
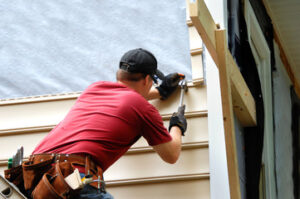
Charleston Siding Repair is more than just an exterior touch-up. It protects the structure from wind, moisture, and insects. When siding fails, deeper layers become vulnerable. Timely repairs restore both beauty and protection.

Siding Repair

Small cracks in siding may appear harmless at first. But these often signal internal shifts or pressure points. Ignoring early damage can lead to rot and insulation failure. Repair work prevents the spread of costly complications.

Moisture infiltration is the most dangerous issue caused by damaged siding. When water enters gaps, it settles behind the panels. This creates the perfect environment for mold, mildew, and decay. Repairing these breaches stops deterioration at the source.

Nails or fasteners that loosen over time create movement between panels. This leads to misalignment and visible seams. Realigning and refastening panels returns the structure to its tight seal. It also prevents wind uplift and rattling during storms.

Siding corners are particularly prone to damage from impact and weather. If these areas split or shift, they create entry points for pests and moisture. Corner trim repair strengthens visual framing and reinforces the joint system. Without it, the surrounding siding begins to detach.

Warped siding panels change how water drains from the structure. Water flows behind the panels instead of downward. This undermines the waterproof barrier and stains the foundation. Repairs involve heat reformation or full panel replacement depending on severity.

Color fading signals UV damage that may weaken material composition. Discolored sections may become brittle and prone to cracking. Spot repair combined with coating restores appearance and adds UV protection. Color matching ensures the home retains its cohesive look.

Impact damage from storms or stray objects causes dents and punctures. These must be repaired quickly before the layers beneath absorb moisture. Filler, patching, or replacement helps restore strength and shape. Consistent thickness ensures the wall maintains even performance.

Mismatched siding repairs lead to visible inconsistency on the structure. Color, grain, and material differences become more noticeable with time. Accurate identification of the original siding type is crucial. Repairs that blend well preserve both value and aesthetics.

Siding beneath windows requires extra attention due to water runoff. Over time, the drip edge may fail and affect the panels below. Proper repair includes reinstallation of flashing and caulking. These layers redirect water and prevent infiltration.

Insect damage shows up as small holes, tunnels, or soft patches. Termites, ants, or beetles often chew through wooden components. Repairs involve removal of infested sections and treatment before patching. Failure to treat the cause leads to repeated repairs.

Loose caulking or sealant breaks the protective barrier around joints. Water enters through these gaps and causes unseen problems inside the wall. Removing and reapplying high-quality sealant is part of standard siding repair. Proper adhesion extends the life of adjacent materials.

Vertical buckling indicates problems with installation or heat expansion. Panels press against each other and lift away from the wall. Cutting relief gaps or reinstalling with spacers corrects this tension. Balanced spacing allows materials to expand without warping.

Interior wall stains may point to siding failure outside. Moisture travels inward through hidden cracks and gaps. Repair involves tracing the water source to its origin. Addressing both interior and exterior issues restores the home’s balance.

Fungus or moss growth along the siding base shows poor drainage. Constant dampness affects the siding’s lower edge and invites breakdown. Cleaning, resealing, and adjusting grading prevent recurrence. Repairs often include improved gutter downspout placement.

Siding panels that sag or lean may suffer from broken clips or warped underlayers. When panels lose support, they become vulnerable to shifting. Repairs involve resetting the support structure and securing new brackets. The restored alignment renews the wall’s strength.

Vibration from HVAC units or nearby construction may loosen siding. Over time, repetitive shaking causes gaps to form. Repairs include shock-absorbing materials and tighter fasteners. Eliminating motion preserves the long-term position of each panel.

Rodents sometimes chew through soft siding or nest behind damaged panels. Repair requires both removal and block-off solutions. Sealing the space with chew-resistant material adds an extra layer of protection. Post-repair monitoring ensures they don’t return.

Bubbling on the surface of siding may indicate trapped moisture or heat damage. When air or steam builds behind panels, it causes swelling. Repair involves removing the panel and improving ventilation. Flat reinstallation maintains the building’s smooth profile.

Soundproofing is affected when siding loosens or degrades. Gaps in the structure allow external noise to enter more freely. Repairs that seal the envelope also restore acoustic protection. This improves comfort, especially in noisy environments.

Vertical siding systems suffer damage differently than horizontal ones. Rainwater travels straight down and settles between seams. Repair strategy adjusts for this direction of flow. Sealants and flashing must redirect water without creating blockages.

Heat-absorbing siding colors expand more than lighter shades. Over time, this causes warping if not properly spaced. Repair involves material substitution or strategic trimming. Matching the thermal expansion rate keeps the surface flat and secure.

When panels are painted, cracks or peeling finish reveal underlying damage. Paint failure may come from trapped moisture or improper priming. Repairs require stripping, sealing, and refinishing in multiple layers. A proper paint job also adds weather protection.

The insulation behind siding degrades when exposed to weather through cracks. Gaps allow wind to remove heat from inside the home. Repairing panels helps restore the thermal envelope. Energy efficiency improves once these breaks are corrected.

Older siding materials may become brittle and snap under pressure. Repair involves careful removal to avoid breaking adjacent pieces. New sections are integrated to minimize stress on fragile joints. The process requires patience and knowledge of aging behavior.

Sudden shifts in wall shape may suggest structural settling. This movement affects siding alignment and tension. Repair must include assessment of framing and load support. Otherwise, cosmetic fixes won’t last beyond seasonal cycles.

Siding near decks or garden beds suffers from splashback and moisture exposure. Soil rises against the surface, creating a damp environment. Repair includes moisture barriers and clearance adjustments. Elevating siding above grade protects it from decay.

Expansion gaps that disappear over time signal potential compression. Without room to shift, siding buckles during temperature swings. Repair involves spacing correction and sometimes trimming excess material. Proper breathing room extends siding life.

Siding installations often fail at transition points between materials. Where siding meets stone or brick, expansion behaves differently. Flexible connectors are added during repair to bridge these materials. Matching the movement prevents cracking or gapping.

Nail pops appear as raised circles or visible holes on the surface. They weaken panel stability and invite moisture inside. Repairs involve removing loose nails and filling the hole properly. Anchoring with corrosion-resistant fasteners prevents reoccurrence.

Overpainting siding hides flaws instead of correcting them. Trapped moisture beneath paint leads to blistering and rot. Repair requires stripping, drying, and repairing the original material. Painting should always follow complete surface restoration.

Unusual odors indoors may stem from mold behind damaged siding. The smell often enters through vents and wall cavities. Repair involves removing panels and drying the interior wall. Cleaning and sealing eliminate odor sources permanently.

Strong winds test siding attachment strength. If panels shift or rattle during storms, the anchoring system has weakened. Refastening with wind-rated clips improves storm resistance. Reinforcement keeps the siding in place during harsh weather.

Solar reflections from nearby windows can cause heat damage. Concentrated sunlight warps siding over time. Repairs include material swap or adding heat deflectors. Protecting siding from external sources ensures uniform aging.

Streak marks down the siding surface suggest uneven drainage. These marks indicate water has been trapped or redirected poorly. Repairing involves cleaning, sealing, and rerouting runoff. Smooth drainage protects both siding and foundation.

Siding overlaps must remain tight and even. When panels pull apart, they expose the wall underneath. Repair involves reseating the entire section to maintain the water seal. Proper overlap maintains both appearance and strength.

In regions with freeze-thaw cycles, ice wedges can form in siding cracks. These cycles expand the damage each season. Repair includes crack sealing and water diversion methods. Preventing refreezing stops future splits from forming.

Power washing can dislodge loose panels if done improperly. Excessive pressure forces water into sealed gaps. Repairs involve reattaching panels and sealing seams. Controlled cleaning methods are safer for delicate siding types.

Wind-driven rain affects siding at unusual angles. It enters upward-facing cracks and sideways gaps. Repair solutions use angled seals and protective contours. This adjustment resists weather conditions that typical installations overlook.

Siding repair enhances more than just curb appeal. It contributes to insulation, security, pest control, and structural integrity. A well-maintained exterior reflects the health of the entire building. Early intervention always costs less than delayed response.

Every repair made with intention adds years to the structure’s lifespan. With modern materials and precise techniques, damage no longer spells replacement. Siding repair protects from the inside out. It’s a solution that brings strength, style, and stability to every wall.

What You Need to Know About Commercial Electrical Installation

Commercial Electrical Installation differs from residential wiring in terms of scale, safety requirements and specific business needs. A comprehensive understanding of the process allows you to make accurate estimates and ensure compliance with regulations and standards.

Electrical Installation

Electrical raceways, like conduit systems (RMC and EMT), cable trays and duct systems like bus duct, offer physical damage protection for wiring in commercial space. These also allow for easy cable organization and efficient power distribution.

Commercial electrical installation is more complex than residential wiring, as electricians must consider additional elements like the needs of different spaces and equipment. An electrical load calculation is performed to ensure the system can handle peak usage without overheating, and electricians work closely with architects and engineers to incorporate the electrical plan into the building’s overall design.

Commercial installations also include special considerations for safety and security. For example, fire alarms and security systems often require electrical power and wiring, which must comply with standards to minimize the risk of hazards like electric shock and fire. Keeping up to date with the latest safety regulations is essential for any business owner, and routine inspections help to identify potential issues that need attention.

Electrical wiring in a commercial setting is thicker than that found in a home, and it’s usually shielded from possible contaminants such as corrosive gases or liquids by a protective coating. This is an important feature, as it reduces the likelihood of dangerous conductors contacting other objects and causing a short circuit.

The structure of a commercial setting also influences the way an electrical system is installed, with different requirements for areas like offices, warehouses, and manufacturing zones. In addition to standard lighting and power sockets, industrial settings may need heavy-duty machinery wired for efficient operation.

Once the electrical installation is complete, a comprehensive testing and inspection process is carried out to verify compliance with safety standards. This involves examining the wiring to make sure it is not exposed, checking that switches and outlets are functioning properly, and ensuring that the grounding and bonding systems are in good working order. In addition, regular maintenance procedures should be carried out to address any problems identified during inspections.

Assessment and Planning

The initial assessment and planning stage of commercial electrical installation is vital for ensuring a comprehensive, seamless, and efficient process. It begins with a thorough evaluation of the power needs of the space, considering factors such as floor occupancy and the types of equipment used. It also involves assessing potential future upgrades and requirements, enabling businesses to better budget for them.

Once the assessment and planning phase is complete, it’s time to begin setting up the primary components of the electrical system. This includes installing the main panel board, which distributes electricity to different circuits throughout the building. It must be properly sized and rated to handle peak usage without overloading or posing a fire hazard. The wiring will then connect the main panel board to various areas within the facility, including lighting systems and fixtures, emergency lighting, and power outlets and switches. The wiring should be run in conduit to protect it from damage and to minimise the number of junction boxes needed.

It’s important to carefully assess the specific needs of a commercial property, as not doing so can lead to costly mistakes during the installation process. Common mistakes include not adhering to safety regulations, using improper wiring methods, and neglecting regular maintenance. By following the tips and guidelines outlined in this article, you can ensure a successful and hassle-free electrical installation process.

Emerging technologies are shaping the future of electrical installations, enabling smarter and more energy-efficient solutions. From smart lighting to energy storage, these innovations can provide businesses with more control and flexibility over their power consumption and supply, reducing costs and promoting sustainability. In addition, advancements in safety standards are allowing electricians to implement new and improved circuit protection devices and insulation materials, further protecting people and businesses from electrical hazards.

Installation

Electrical wiring in commercial spaces has to meet higher standards and regulations. This is because these buildings tend to have higher power consumption. Additionally, they might house heavy machinery or equipment that requires specific electrical wiring. Moreover, they might also have back-up electricity to cater for emergencies.

During the installation process, it is crucial to follow strict safety protocols. This includes turning off the main power supply before beginning work and using insulated tools. Additionally, the electrician must ensure that all circuits are properly labelled to avoid confusion and reduce the risk of accidental activation.

The first step in commercial electrical installation involves connecting the building to the municipal power grid. Then, the electrician must run the wiring throughout the space, following pre-planned routes and securing them to prevent damage. They must also install outlets, circuit breakers, and switches in their designated locations. They must also set up lighting systems, including emergency lights and exit signs.

One of the biggest differences between residential and commercial electrical installations is that commercial settings prioritize accessibility over aesthetics. This is because electrical wiring in commercial spaces often runs through open areas, and they may be exposed to corrosive materials or moisture. Additionally, they need to be able to be easily repaired and shut off. Therefore, commercial wiring is often more rugged and heavily insulated than domestic wiring.

In addition to this, it is crucial to hire an experienced and qualified commercial electrician to handle the electrical work in a commercial property. This will help you avoid common mistakes and issues like failing to adhere to safety protocols, ineffective installation of electrical panels, and incorrect wiring methods. In addition, a professional will be able to handle complex tasks like outdoor direct burial feeders and busways.

Testing

Testing is vital for confirming that the design and construction of electrical systems meet specific standards and regulations. It’s also an opportunity to identify and resolve issues, minimizing the risk of unexpected failures or malfunctions. This proactive approach helps ensure maximum efficiency and extends the lifespan of electrical infrastructure.

A commercial electrical system must meet stringent requirements to ensure occupant safety. The key components include the main electrical panel, which distributes power to other circuits and equipment in a building. The panel must contain adequate circuit breakers to protect against overloads. Wiring is responsible for carrying electricity from the panels to different areas of the building, and it must comply with industry standards. Junction boxes and conduit pipes help keep wiring organised and protected, while outlets, switches, and lighting fixtures provide access points for electrical devices and appliances. Finally, network cabling supports telecommunication and internet connections in a business setting.

During the installation process, contractors must follow strict safety precautions to avoid electrocuting workers or causing other damage. This includes shutting off the main power supply before beginning work and using insulated tools to prevent contact with live wires. They must also follow pre-planned routes and carefully secure cables to minimise the chance of accidental tripping or falling.

Testing is an essential part of any electrical installation, and it’s especially important for commercial settings. These settings have greater power demands and require more complex equipment than residential settings, making them more susceptible to failures. Regular testing helps prevent unexpected malfunctions and extends the life of the system. It also helps reduce operational downtime and boosts productivity. Identifying and addressing issues during this phase helps minimize costly repairs and maintenance costs in the future.

Inspection

One of the most important parts of commercial electrical installation is inspection. This ensures the work meets standards and is safe for professional occupancy. Inspectors will look at all exposed wiring to identify any signs of wear, potential issues, or violations of electrical codes that may pose a danger. They will also inspect circuit breakers and fuses to ensure they are functioning properly.

One common issue is improper grounding or bonding, which can result in serious physical damage to people and property. In addition, inspectors will check that all outlets and equipment are properly grounded or bonded, and that they have proper GFCI (ground fault circuit interrupter) or AFCI (arc fault circuit interrupter) protection as required by code for specific uses. They will also make sure that all access points are clearly labeled for safety and that non-qualified personnel cannot reach them.

Regular inspections of commercial electrical systems are an effective way to detect potential issues that can lead to expensive repairs down the road. They can also catch energy inefficiencies that will reduce electricity bills and help the environment. In addition, they can ensure that systems and appliances function correctly, avoiding production delays or losses.

Using a reputable and experienced team of electrical professionals for your commercial electrical installation will ensure compliance with electrical regulations, the highest level of safety, and long-lasting efficiency. A qualified team will use a range of specialised tools and equipment to carry out thorough testing, including voltage meters, thermal imaging cameras, insulation resistance testers, and others. They will provide a comprehensive report with clear explanations of any issues found, and recommendations for action. They will also provide documentation for future reference, ensuring that you meet all relevant maintenance and compliance requirements.

Cabinet Refacing – Give Your Kitchen a Fresh Look

Cabinet Refacing Sacramento CA is one of the easiest ways to refresh your kitchen. It can give your home a whole new look without the expense of a major remodel.

Cabinet Refacing

With refacing, cabinet boxes are left in place and existing surfaces are altered with veneer panels to hide damage and flaws. This process takes 3-5 days and causes minimal disruption to your home’s daily life.

Cabinet refacing is a cost-effective way to give your kitchen a fresh, updated look without the expense of a full renovation. It involves replacing your old doors and drawer fronts while leaving the existing cabinet boxes intact. It is also a much less disruptive project than a complete remodel and can be completed in a fraction of the time.

Homeowners can choose from a variety of refacing materials, including solid wood, veneers, and thermofoil, to create a custom look. Each type of material has its own unique advantages and characteristics, so it is important to choose the one that best suits your needs. Solid wood is an attractive and durable option that can withstand years of use. It can be stained or painted to complement any decor style. Veneer is another popular choice, with options that mimic the look of traditional or contemporary wood finishes. It is more affordable than solid wood, and it is available in a variety of colors and textures.

Thermofoil is a modern material that offers a variety of color and texture options, as well as easy maintenance and durability. It is a good alternative to solid wood for those who are looking for a sleek and contemporary design. It is manufactured by bonding a high-density fiberboard (MDF) with a vinyl layer under pressure. The result is a smooth surface that resists warping and scratches.

When choosing a cabinet refacing company, it is important to find one with a proven track record and excellent customer service. Look for a company that provides a free design consultation and offers a warranty on both the material and labor. Ensure the company you choose is licensed and insured, and ask for referrals from previous customers.

While refacing can make your kitchen look new again, it is important to note that it does not address any structural issues with the cabinets themselves. It can hide damage to the underlying cabinet boxes, but it does not fix the sagging shelves or weak joints found in many older cabinets. Unless these problems are addressed, refacing will only provide a short-term solution and may not increase the resale value of your home.

Time

Cabinet refacing is much quicker to complete than a total kitchen renovation, and it can also be more cost-effective. However, the timeline for this project will depend on a few factors. For example, the number of cabinets that are being refaced will impact the overall timeframe of the project. Additionally, if you are adding new countertops or appliances, it’s important to coordinate these changes with your cabinet refacing so that everything matches seamlessly.

Another factor to consider is the level of customization that you would like to achieve with your refacing project. If you are looking for a more dramatic change, then cabinet refacing may not be the best option for you. In addition, refacing doesn’t address structural issues that may be present in your existing cabinets. In these cases, saving up for a complete replacement may be a better long-term strategy.

Choosing the right contractor for your cabinet refacing project is critical. Look for a company with years of experience and a solid reputation in the industry. Obtaining referrals or viewing portfolios from past clients can help you gauge the quality of work and the craftsmanship that your potential contractor will provide. In addition, you should make sure that your chosen contractor is licensed and insured.

The last thing you want is to end up with a subpar renovation that could damage your home or leave behind shoddy workmanship that will stand out like a sore thumb. By working with a trusted cabinet refacing company, you can rest assured that your project will be completed on-time and within budget.

Whether you are interested in a simple color change or a major transformation, refacing your cabinets is an excellent choice for homeowners who are on a tight budget or don’t have the time to invest in a full kitchen renovation. In many cases, it can be completed in a matter of 3-5 days and will leave your kitchen fully functional during this time.

Materials

Cabinet refacing materials provide a variety of aesthetic and durability options. However, selecting the right material for your project requires careful consideration of your design preferences and budget. A good cabinet refacing company will guide you through the process and ensure that your new kitchen design is functional and long-lasting.

Solid wood: The most durable cabinet refacing option, solid wood veneers offer an authentic high-end look that complements traditional and modern styles. They are also easy to clean and resistant to moisture. Solid wood is prone to warping and swelling when exposed to excessive moisture, though, so you’ll need to maintain a regular cleaning schedule and regularly check for signs of damage or wear.

Laminate: Made from layers of paper, resins, and a protective clear coating, laminates are an affordable and low-maintenance solution for kitchen cabinet refacing. They are available in a variety of colors, patterns, and finishes that mimic the appearance of natural materials like stone and wood. They are also easy to clean and resistant against heat, water, and stains. However, laminates are more prone to scratches and may require periodic recoating.

Thermofoil: Made from a flexible vinyl material bonded to a medium-density fiberboard core, thermofoil cabinets are a popular choice for contemporary and modern designs. They are highly durable and offer a wide range of color and finish options that can match virtually any design style. They are also moisture-resistant and are less prone to cracking or delamination than wood veneers.

Wood veneer: A thin layer of real wood glued to the surfaces of the cabinets, wood veneers are an inexpensive and attractive alternative to solid wood. They’re easy to clean and resist heat and stains, but they aren’t as resilient as solid wood and can easily crack or swell when exposed to moisture.

While refacing can provide an attractive cosmetic upgrade, it doesn’t address structural problems such as sagging shelves or weak joints in the cabinet boxes. This makes it essential to identify any existing issues before refacing your cabinets. It’s also important to hire a professional contractor to perform the work, as it involves accurate measuring and cutting and uses hazardous tools.

Appearance

Cabinet refacing is a cosmetic upgrade that will give your kitchen a new look. However, it is important to understand that this type of work will not address any structural problems with your cabinets. Refacing won’t address things like sagging shelves or weak joints, which are commonly found in older cabinetry. It also won’t improve a poor kitchen layout or make room for more storage or specialized features like designated appliance storage, pull-out drawers or built-in lazy Susan corners.

Kitchen cabinet refacing is generally less invasive than cabinet painting, since the existing cabinet boxes and frames remain intact. However, it is still a major project that requires a significant amount of prep work and multiple coats of paint. As a result, it may take longer to complete than a refinishing job.

Refacing involves the application of wood veneer to all exposed surfaces of your cabinets. While this is an attractive option, it isn’t as durable as a solid surface and can be vulnerable to moisture and temperature changes. This is because the veneer doesn’t breathe as well as a solid wood surface. This can cause it to expand or shrink causing cracks and warping of the doors.

Another problem is that refacing with wood veneers can lead to an inconsistent appearance. Many natural woods turn yellow over time, and because different parts of the cabinets turn yellow at different rates, refaced cabinets can end up with an inconsistent color or even a mottled effect. If your cabinets are made of a variety of materials, this issue can be especially problematic. 

The Essential Role of Movers in Simplifying Relocation

Movers play a crucial role in the process of relocating from one place to another, offering a service that eases the burden of physically transporting belongings. The process of moving can be both exciting and stressful, often marking the beginning of a new chapter in life. Whether it’s moving to a new home, office, or business location, the services provided by movers help streamline the transition and ensure that belongings are transported safely and efficiently. Contact Movers Meridian ID for professional help.

Movers

Movers are professionals who specialize in packing, loading, transporting, unloading, and unpacking items. Their expertise in handling fragile, heavy, and valuable possessions reduces the risk of damage and provides peace of mind to individuals and businesses alike. The demand for moving services has grown steadily over the years due to the increasing need for mobility and the desire for convenience. People often turn to movers when they face complex or large-scale relocations, knowing that the process involves more than just packing and loading boxes. The coordination required to move furniture, appliances, and personal items without causing damage or loss requires a level of skill and experience that professional movers bring to the table.

The moving process typically begins with an assessment of the items to be transported. Movers often provide consultations to determine the volume of belongings, the distance to be traveled, and any special requirements such as fragile items or oversized furniture. This initial step allows movers to plan effectively, ensuring that they have the appropriate materials and equipment to handle the job. Proper planning is essential in minimizing the risk of damage and ensuring that the move is completed within the agreed timeframe. Once the assessment is complete, the packing phase begins. Professional movers are trained to handle various types of items, using specialized packing materials such as bubble wrap, foam, and reinforced boxes to protect fragile and valuable objects. Items like glassware, electronics, and artwork require extra care and attention to ensure they arrive at their destination intact. Movers often use labeling systems to keep track of items and make the unpacking process more organized and efficient.

Loading is another critical phase where the expertise of movers becomes evident. Heavy furniture, appliances, and boxes need to be carefully maneuvered to avoid damage to the items and the property. Movers use tools such as dollies, straps, and ramps to lift and secure items in the moving vehicle. Proper loading techniques help distribute weight evenly, reducing the risk of shifting and damage during transportation. The transportation phase requires careful driving and navigation. Movers are often familiar with the best routes to take, avoiding traffic and road hazards to ensure a smooth and timely delivery. Professional drivers are trained to handle large vehicles, ensuring that items remain secure and stable throughout the journey. Communication between the moving team and the client is crucial during this phase to address any changes or delays promptly.

Unloading and unpacking complete the moving process. Movers carefully remove items from the vehicle, taking care not to scratch floors or damage walls in the process. The placement of furniture and boxes is usually guided by the client’s instructions, ensuring that the new space is set up according to their preferences. Professional movers often go the extra mile by assembling furniture and installing appliances, making the transition into the new space more comfortable and less stressful for the client. The value of professional movers extends beyond physical labor. Their experience in handling logistics, problem-solving, and customer service helps alleviate the emotional and physical strain associated with moving. Clients benefit from the efficiency and professionalism that movers bring, allowing them to focus on settling into their new environment rather than worrying about the details of the move.

Challenges often arise during the moving process, and experienced movers are equipped to handle them. Weather conditions, traffic delays, and unexpected obstacles such as narrow doorways or staircases require quick thinking and adaptability. Movers are trained to anticipate these challenges and implement solutions that minimize disruptions. Insurance and liability coverage provided by moving companies offer additional peace of mind to clients, ensuring that any damage or loss incurred during the move is appropriately addressed. The cost of hiring movers varies depending on factors such as the distance of the move, the volume of items, and any additional services required. While some people may hesitate to hire movers due to cost concerns, the time and effort saved often outweigh the expense. The ability to rely on professionals to handle the heavy lifting and logistics allows clients to focus on other important aspects of their relocation, such as adjusting to a new neighborhood or setting up a new business location.

The moving industry continues to evolve with advancements in technology and changing customer expectations. Many moving companies now offer tracking systems that allow clients to monitor the progress of their move in real-time. Digital inventory management systems help ensure that no items are lost or misplaced during transit. Customer service has also become a key focus, with movers striving to provide a positive and stress-free experience from start to finish. Specialized moving services have emerged to cater to specific needs. For instance, some movers specialize in handling delicate items such as antiques, pianos, and fine art, while others focus on long-distance or international moves. Eco-friendly moving options, such as reusable packing materials and fuel-efficient vehicles, have also gained popularity as clients become more environmentally conscious. The professionalism and dedication of movers contribute significantly to the overall success of a relocation. Their ability to work efficiently under pressure, solve problems on the spot, and maintain a positive attitude helps create a smooth and pleasant moving experience for clients.

The importance of movers extends beyond residential relocations. Businesses often rely on movers when expanding, downsizing, or reorganizing their operations. The efficient transportation of office furniture, equipment, and documents requires careful planning and execution to minimize downtime and ensure business continuity. Movers play a vital role in facilitating these transitions, helping businesses adapt to new spaces and operational requirements. The emotional aspect of moving should not be overlooked. Relocating to a new home or office often involves a mix of excitement, anxiety, and nostalgia. Movers provide more than just physical assistance; they offer reassurance and support during a potentially stressful time. Their ability to handle the details of the move allows clients to focus on adjusting emotionally and mentally to their new environment.

Seasonal trends and economic factors also influence the moving industry. The demand for movers tends to increase during certain times of the year, such as the summer months when families prefer to relocate while children are out of school. Economic conditions, housing market trends, and corporate relocations also impact the volume of moving activity. Movers must adapt to these fluctuations, adjusting their services and resources to meet changing demand. Training and professional development are essential in maintaining the quality of moving services. Movers are often required to undergo training in proper lifting techniques, equipment handling, customer service, and safety protocols. Continuous learning ensures that movers remain skilled and knowledgeable, capable of handling a wide range of moving scenarios. The physical demands of the job require strength, endurance, and attention to detail. Movers often work long hours, navigating challenging environments and handling heavy loads with care and precision. Their ability to work as a team, communicate effectively, and maintain a positive attitude under pressure contributes to the overall success of the move.

The future of the moving industry will likely be shaped by technological advancements and changing customer expectations. Automation, artificial intelligence, and data analytics are expected to play a greater role in optimizing moving processes and improving customer experiences. Virtual consultations, automated inventory tracking, and AI-driven route optimization are some of the innovations that could enhance the efficiency and accuracy of moving services. Customer preferences are also evolving, with a growing emphasis on convenience, transparency, and environmental responsibility. Movers who adapt to these trends and prioritize customer satisfaction will likely remain competitive in a changing market. The role of movers in facilitating life transitions cannot be overstated. Their ability to manage the logistical, physical, and emotional aspects of moving provides invaluable support to individuals and businesses. The trust and confidence that clients place in movers reflect the essential nature of their work and the positive impact they have on the moving experience. Whether relocating across town or to a different region, the expertise and dedication of professional movers make the process smoother, more efficient, and less stressful.

Minimally Invasive Robotic Hernia Surgery

Minimally invasive robotic surgery results in less post-op pain, shorter recovery times and lower chances of hernia recurrence than traditional open hernia repair. This procedure uses smaller incisions and a mesh reinforcement patch to heal hernias.

Hernia Surgery

During the surgery, your surgeon sits at a console and operates through small cuts (less than an inch) in your abdomen. The surgeon’s hand movements are translated by the robot into precise actions of the instruments. Read on Robotic Hernia Surgery for more information.

Millions of people worldwide suffer from hernias, which occur when intestines protrude through a weak spot or tear in the muscles of the abdomen or groin. A hernia can be painful and requires surgical intervention. Traditional hernia surgery involves putting a patch or piece of mesh to prevent the intestines from pushing through the hernia hole. But robotic hernia surgery is a less invasive option that may offer better results and a shorter recovery period.

Robotic hernia repair procedures are based on the Da Vinci system, a minimally invasive technique that uses small incisions to perform surgery. In general, surgeons make a few incisions of less than an inch each and insert a tube with a light and camera attached to it, called a laparoscope, into one of the incisions. They then use small surgical tools to perform the operation. The Da Vinci system allows surgeons to view the procedure on a video monitor, which helps them to perform the surgery with greater accuracy and precision.

The Da Vinci surgical system also offers other benefits for patients. For example, it allows surgeons to sew mesh for hernia repair without using tacks in the abdominal wall, which can cause pain and complications. Robotic hernia surgery also usually requires a smaller incision than other laparoscopic procedures. This means patients experience less pain and have a faster return to normal activities.

Despite its advantages, some researchers have raised concerns about robotic hernia repair. A study published in April 2019 compared robotic and standard laparoscopic hernia repair in 113 patients. It found that early clinical outcomes were similar for both robotic and laparoscopic hernia repair, including postoperative pain, quality of life, mobility, cosmesis, and wound morbidity. However, the robotic procedure was more costly and required more operative time than the laparoscopic approach.

The researchers also noted that robotic hernia surgery is not for every patient or surgeon. It requires specialized training to be able to use the equipment effectively. Additionally, there is a risk that the robot could malfunction during the procedure. For these reasons, some patients may be better served by an open surgery procedure.

Procedure

A hernia occurs when intestines protrude through a weak spot or tear in the abdominal muscle causing a bulge that requires surgical intervention. Hernia repair can be performed with open, laparoscopic or robotic surgery. Robotic hernia surgery is a newer technique that allows surgeons to operate through smaller incisions. It is more effective than traditional hernia surgery in restoring patients to their normal lives with faster recoveries.

During the procedure, your doctor will create small tubes called “trocars” into the abdomen through which a camera and instruments are placed. Your doctor will then sit at a console in the operating room and control the instrument movement from there using a high definition 3D monitor. The robotic arms have a range of motion that mimics human hand movements, enabling delicate tissue dissection and suturing with extreme precision.

The first step in hernia surgery is to place the herniated intestine or tissue back inside the body. This can be done with open or laparoscopic surgery, but robotic hernia surgery provides more advanced techniques that reduce the risk of complications and recovery time.

With robotic hernia surgery, a synthetic mesh is used to strengthen the abdominal wall and prevent future hernias. This mesh can be incorporated in the abdomen through three small abdominal incisions instead of one large hernia incision. This significantly decreases the risk of wound complications and infection compared to conventional hernia surgery.

Patients with hernias often experience numbness, pain and a sense of pressure in the abdomen or groin. They can also have a cough that feels like they are not getting enough air. If a hernia is left untreated, it can increase in size over time and lead to more serious complications that require emergency surgery.

The robotic hernia repair procedure is an excellent option for many patients, including those with hernias that have recurred following previous hernia repairs or surgeries. Many patients who have experienced painful recoveries from traditional hernia surgery are thrilled with the benefits of robotic hernia repair. They are relieved they did not have to put off hernia surgery so they can return to work and other activities sooner.

Recovery

For patients undergoing robotic hernia surgery, it is important to follow specific guidelines for recovery. This will help prevent complications and promote healing. Patients should drink plenty of fluids and eat a healthy diet, including foods rich in fiber. This will help avoid constipation, which is a common side effect after hernia repair surgery. It is also a good idea to avoid alcohol and tobacco, as these can interfere with the healing process.

Robotic hernia surgery is typically a short procedure, lasting only about one to four hours. Most patients go home the same day or within a few days. However, if the hernia is severe, an overnight stay may be necessary. Patients should have someone to drive them because they will be groggy following the surgery and can’t safely operate a vehicle.

The surgeon creates a few small incisions to access the hernia and repair it using a mesh-like material that is stronger than tissue. During the surgery, most patients remain awake. Sedation may be used if the patient is anxious or in pain. However, sedation does increase the risk of complication, such as infection or blood clots in the lungs. It’s important to choose a skilled and experienced surgeon to reduce the chance of complications.

In a recent study, researchers found that robotic hernia surgery has a lower infection rate and less pain than traditional surgical methods. The researchers analyzed data from 10 surgeons at two hospitals in their healthcare system who performed elective robotic hernia procedures. They compared hernia-related quality of life measures and other clinical outcomes before and after surgery.

The results showed that most patients who had robotic hernia surgery were discharged the same day. Those who stayed overnight were more likely to have a hernia procedure that required an open approach, such as a hernia repair operation in the umbilical area. However, this study is retrospective and has several limitations, including the number of patients and the type of hernia repairs that were performed. In addition, the number of patients who had an additional procedure was not recorded.

Cost

A common concern with the use of robotic hernia surgery is that it’s more expensive than conventional, laparoscopic methods. However, a recent study comparing robotic hernia repair to open ventral hernia repair demonstrated that robots actually cost less than traditional surgical techniques. The authors of the study examined costs for hernia surgery, post-discharge care and complication rates from both procedures. The results show that while the initial cost of robotic hernia surgery may be higher than traditional hernia surgeries, it is much cheaper in the long run due to a shorter hospital stay and reduced complications.

Robotic hernia surgery involves minimally invasive incisions. Three to four small incisions are made in the abdomen where different instruments are passed through. This allows surgeons to operate more safely and with greater precision than traditional methods. It also reduces the risk of infection and wound complications. In addition, robotic hernia repair can often be performed on an outpatient basis allowing patients to go home sooner.

In the study, 113 patients with a unilateral hernia were enrolled in either standard laparoscopic or robotic transabdominal preperitoneal (TAP) hernia repair. Patients requiring conversion to an open procedure or undergoing simultaneous procedures were excluded. The primary outcomes included postoperative pain, health-related quality of life, mobility, and cosmesis. Secondary outcomes included operative time and cost, surgeon frustration, and surgeon mental workload.

The hernias most commonly treated by robotic hernia surgery are groin hernias and abdominal wall ventral hernias (VHR). In the case of groin hernias, a bulge of muscle or fat protrudes through a weak area in the abdominal muscle. In the case of an abdominal wall hernia, the surgeon creates a space inside the abdomen to place a piece of mesh to reinforce the area and prevent future herniations.

In cases of a ventral hernia, the stomach pushes upward through a hole in the diaphragm. This can trigger symptoms such as chronic acid reflux and chest pain. With robotic hernia surgery, the surgeon can return the stomach to its proper place in the abdomen and repair the defect in the diaphragm. In most cases, patients can go home the same day.

How to Spot Common Concrete Repair Problems

Concrete is a strong and durable material, but it can still be damaged over time. Addressing problems promptly helps prevent further damage and saves time and money in the long run.

Concrete Repair

Concrete Repair Bismarck requires meticulous assessment, precise execution, and sufficient curing time. Skipping surface preparation or rushing the curing process can lead to failure of the repair.

Cracks in concrete are common and can cause damage if not repaired quickly. They can create trip hazards and may allow water to pool, creating a breeding ground for pests. Proper maintenance and regular inspections can catch small cracks before they become serious problems, preventing further issues down the road and saving money.

The best repair method depends on the type and severity of the crack. For surface cracks, a simple cement patching compound can be used to fill the crack and smooth it out. For larger cracks that threaten structural integrity, epoxy injection is a durable and effective solution.

Before beginning any concrete crack repair, it is important to clean the area and make sure that any debris has been removed. This step is essential to ensure that the new patching material will stick and adhere properly. If you are repairing a wide crack, you may also want to undercut the sides of the crack by chiseling them out in an inverted V-shape. This will provide a wider base for the patching material to hold on to and will help prevent the crack from re-occurring.

Other repair methods include the use of bonding agents and pre-stressing steel. These methods can help improve the durability of a concrete repair and increase its resistance to freeze-thaw cycles.

It is also a good idea to apply a sealant after any concrete repairs are completed. This will help protect the repair from weathering and harsh chemicals, extending its lifespan and minimizing future issues.

Depending on the extent of the damage, it may be necessary to hire a professional contractor to assess the situation and recommend a repair strategy. A contractor will be able to identify the underlying causes of the damage and determine which repair method is best suited for the job.

While concrete will never be completely free of cracks, understanding the curing process and underlying causes can help to alleviate anxiety about minor cracks and reassure homeowners that they are taking proactive steps to protect their property. With proper inspections, regular maintenance and quick repairs when needed, homeowners can rest assured that their concrete surfaces will continue to look beautiful for years to come.

Leaks

Some leaks are easy to spot, such as a dripping faucet or a leak around the base of a toilet. Other leaks are more difficult to detect, such as those that develop underneath a concrete foundation and can result in significant structural damage if they go unchecked for long. Luckily, there are some early warning signs of a slab leak that homeowners should look for to help prevent costly repair bills down the line.

Slab leaks occur when a plumbing system develops a leak under a building’s concrete slab foundation. These leaks can cause serious problems for a home or business, including water damage and potential mold growth. Learn more about these hidden leaks, how they can damage your property, and the best ways to address them.

If you suspect a slab leak, the first thing to do is shut off all of your home’s water sources, then check your water meter. If the meter is still moving, your plumbing has a leak that needs to be addressed. Next, take a look at your floor to see if there are any unexplained stains or spots that indicate water is being pushed up through the concrete flooring.

Moisture that accumulates near windows is also a common sign of slab leaks. Water leaking under the concrete can push up through cracks in the slab and into living areas, where it can damage floors and furniture.

When addressing slab leaks, it’s important to choose the right repair method. For example, surface patching can work well for minor cracks and localized leaks. This technique involves injecting epoxy resin into hairline cracks and fissures to penetrate and seal them. For more severe cracks, polyurethane grout injection is often the preferred option due to its high-performance capabilities. This material is particularly ideal for concrete structures prone to movement, as it can withstand even significant structural shifts without losing its sealing abilities.

The most effective way to repair a slab leak is to use a specialist, who will precisely locate the problem using specialized equipment. Then, they’ll cut into the concrete slab to access the leaking pipe and replace it with a new one. This method is often the most expensive, but it’s also one of the most effective at preventing further damage.

Crack Repair

Cracks in concrete surfaces are a natural occurrence and can be caused by a number of factors. However, cracks can also indicate a more serious problem, such as soil instability that can lead to shifting and settlement of the slab. While it is difficult to prevent all concrete cracks, you can take steps to repair them as soon as they appear to ensure the stability of your home or business.

The first step in concrete crack repair is cleaning the area around the crack with a pressure washer and detergent to remove any debris that may be stuck in the crack. This will help to ensure that the crack repair material adheres to the concrete properly. Next, you will need to decide what type of crack repair you will use. Narrow cracks that are less than 1/4 inch wide can be repaired using a masonry concrete patching compound that comes in cartridges designed to fit into a caulking gun. Larger cracks will require a more involved process that involves using foam backer rod to fill the crack and creating a concrete patch.

Depending on the severity of your concrete cracks, you may choose to use a polymer-based grout or epoxy injection to fix them. Epoxy injection is typically used for structural crack repairs that involve basements and foundations. Polymer-based grouts are commonly used for concrete repair because they do not shrink and have varying viscosities that can be used to target specific areas of the crack.

When using a polymer-based grout, it is important to follow the manufacturer’s directions for proper application. It is also a good idea to wear rubber gloves and safety glasses when handling the product as well as to clean the surface of any dirt or debris that may be stuck to it. If you are using an epoxy injection, you will need to drill holes along the crack and insert injection packers or “injectors” that will allow you to inject the epoxy into the crack.

Rhino carbon fiber concrete crack lock stitches are an evolution of rebar and are a more cost-effective solution to repairing and reinforcing concrete cracks than traditional rebar. They are easy to install, do not rust and are ideal for repairing concrete slabs, poured walls and swimming pools.

Spalling

Spalling is not as obvious as cracks, but it can be equally damaging to concrete surfaces. The process involves exposing aggregates through small pock marks in the surface of the concrete. The voids also increase the permeability of the concrete, allowing water and salts to seep in and accelerate deterioration. In addition to weakening the concrete, spalling can also pose safety hazards and reduce the marketability of commercial or residential properties.

To prevent spalling, it’s important to maintain adequate concrete cover for reinforcing steel and use corrosion inhibitors to slow down rust. It’s also a good idea to resurface concrete surfaces with coatings or adhesives that provide additional protection against moisture and chemicals. Regular inspections can help detect spalling early on, allowing it to be addressed before the damage becomes more serious.

In the case of concrete spalling, repairing it requires knocking off loose fragments and cleaning the damaged area. A hammer or chisel should be used to carefully chip away any exposed rebar and ensure that the concrete repair product can bond to it properly. In the case of significant spalling, the best option may be to replace the affected area with new concrete. It’s essential to work with a professional contractor to ensure that the replacement concrete is properly mixed, poured, and cured.

Whether you have minor cracks, large holes, or areas of spalling, it’s important to contact a local concrete repair company to get the job done right. Concrete experts can identify the root cause of your concrete deterioration and recommend the appropriate repair method to ensure that your concrete remains safe, stable, and attractive for years to come. Sign up for our newsletter to receive tips and tricks on how to maintain your concrete. You can unsubscribe at any time. Message and data rates may apply. You may have to enter your email address twice to confirm. This is to verify that you are a human and not a spam bot. We will never share your information with any third party. By clicking “Subscribe,” you agree to these terms.

The Importance of Gutter Cleaning

Keeping your gutters clean is an important part of protecting your home. Clogged gutters can lead to leaky roofs, rotting fascia, mold growth, and foundation damage.

Gutter Cleaning is a difficult chore that can be made easier by using specialized tools. Some of the most useful tools include rakes, handheld blowers, and extension poles.

Gutter cleaning is one of the many tasks that comes with homeownership. The task is important for a number of reasons, including the fact that it reduces the risk of water damage to roofs and foundations. It also prevents pest infestations and keeps the house looking great. The job is not without its dangers, however, and it is recommended that homeowners hire a professional service to do the work for them.

There are a number of things that can go wrong when cleaning gutters, and the consequences can be severe. Those who attempt to do the job themselves should wear gloves and safety glasses to protect their hands and eyes from debris and other hazards. They should also use a sturdy ladder that is placed on a level surface. Lastly, they should place a drop cloth below each section of the gutter to catch any fallen debris.

The most common mistake made by those trying to clean their own gutters is overreaching. This can cause them to lose balance and fall off the ladder or roof. It is best to follow the three-points-of-contact rule: Both legs and one hand should be firmly on the ladder at all times.

Another potential hazard is using metal tools to remove gutter debris. This can damage the gutters and scratch or chip the paint. A hose should be used to spray down the gutters, and a pistol-grip nozzle is preferred to allow for control of water pressure with the other hand. A bucket should be used to collect debris and a garden shovel or drain clearing tool is helpful for removing clogs.

Gutters are designed to channel water away from the house. However, if the gutters become clogged with leaves, dirt and other debris, the water can flow over the sides of the home and cause significant damage to the roof and foundation. Regular gutter cleaning can eliminate this problem and ensure that the gutters are properly functioning. It also helps to keep down the cost of maintenance by preventing the need for repair and replacement.

Gutter Cleaning Costs

Gutter cleaning is an essential home maintenance task, helping to prevent clogs, which can lead to water damage and other structural issues. In addition, clogged gutters can attract pests, such as rats and mosquitoes, and create dangerous mold and mildew. Gutter cleaning is also a great way to extend the lifespan of your roof and minimize basement flooding and other problems.

The cost of gutter cleaning varies, depending on the type of home and the condition of the gutters. For example, it is usually cheaper to clean the gutters of a single-story home than a two- or three-story home. This is because it is harder and more risky to climb higher up on a multistory house. Additionally, if your gutters are heavily clogged, it may take longer to clean them than if they were clearer.

Many professional gutter cleaners charge by the linear foot, so the length of your gutters will affect the price. A typical rate is $0.95 to $1.25 per linear foot for a one-story home and $0.80 to $2 per linear foot for a two-story home. This pricing method makes it easy to compare prices from different companies and ensures that you are getting the best value for your money.

Some gutter cleaning companies may also charge extra for travel fees, which can be a significant amount of money if your home is located in an outlying area or has challenging terrain. Also, if you are having your gutters cleaned during the peak season, you can expect to pay more than during other times of the year.

Some gutter companies also offer a variety of other services, including shingle cleaning and window washing, and these can add to the overall cost. It is important to find a company that offers these services and is licensed, insured, and bonded before hiring them to complete any work on your home. Otherwise, you could be at risk of being scammed by unlicensed and inexperienced workers who do not follow safety procedures. In addition, these unlicensed workers may not be properly insured and could leave you with significant liability issues if they were to fall from your gutters during the cleaning process.

Gutter Cleaning Methods

Gutter cleaning professionals can efficiently remove gutter debris with a garden hose or power washer attachment. This method works well for most homes and quickly removes packed dirt and leaves as well as clogged downspouts. Gutter cleaning services also test downspouts to ensure they’re clear and draining properly. In addition, gutter cleaners clean up any debris that falls to the ground and dispose of it properly.

Clogged and overflowing gutters can cause a variety of problems for homeowners including leaky basements, rotted fascia boards, roof sheathing, and shingle damage. They can also encourage the growth of mildew and mold, which can trigger respiratory disorders. Gutter cleaning prevents these issues by ensuring that rainwater and snow melt are funneled away from the house, preventing water from overflowing and seeping through the ceiling and walls.

A well-maintained gutter system also helps extend the life of your roof. It prevents water and ice from building up on your roof and shifts the weight of the shingles away from the eaves, which can cause them to pull apart and crack over time. It also ensures that shingles aren’t damaged by heavy snow and ice loads and helps prevent the formation of ice dams that can lead to roof collapse.

There are a number of ways to clean your gutters, from the ground or from a ladder. If using a ladder, it’s important to follow proper safety protocols to avoid falling or getting injured. It’s also a good idea to have someone with you to help secure the ladder and support you if possible. Additionally, it’s a good idea to wear work clothes and use gloves to protect yourself from sharp objects and twigs.

Another common gutter cleaning method is to use a handheld leaf blower or a garden hose to spray down the gutters and flush out the debris. This can be a very effective method, especially when combined with a manual cleaning by hand. However, a handheld leaf blower may not be as effective for removing large debris and mud from the bottom of the gutters.

Gutter Cleaning Equipment

Gutter cleaning tools help homeowners clean their gutters quickly and efficiently without compromising safety. The right tools allow homeowners to avoid expensive repairs caused by clogged gutters. These tools also prevent the need for a ladder, saving them time and effort. Some of the best gutter cleaning tools include leaf blower attachments, garden hoses, and pressure washer nozzles. A gutter scoop and a claw are also handy for removing larger pieces of debris that cannot be vacuumed out or removed with a nozzle.

Most gutter cleaning equipment is available for sale at most home improvement stores and online retailers. Homeowners should choose a gutter cleaning tool that is compatible with their existing tools and power sources. For example, a gutter scoop is often compatible with a garden hose or a power-operated leaf blower, and can be attached to the end of a extension pole for easy use. If a homeowner plans to attach their gutter cleaning tool to a extendable pole, they should choose a model that accommodates only one tool at a time for safety and stability reasons.

Water-powered gutter cleaning tools can be very efficient and save a lot of time, but they can also dislodge or damage gutter components if not used properly. To avoid this, homeowners should always start with a lower pressure setting and work their way up to higher settings. They should also ensure that the nozzle is positioned correctly to avoid spraying debris in their eyes or face.

The best gutter cleaning tool to use depends on the type of debris that is being removed. For example, a claw-type gutter cleaner can be used to grab twigs and leaves that are too large for a blower nozzle or vacuum hose. A telescoping gutter cleaning wand is another useful tool for getting to the hard-to-reach areas of your gutters.

Other helpful gutter cleaning tools include a gutter scraper, which allows homeowners to remove smaller debris from the inside of their gutters with the same extension pole that is typically used to reach the outside of the gutter. A leaf blower is another helpful tool for removing surface debris, making it easier to see and reach more difficult pieces of debris with other gutter cleaning tools. Finally, ice melt systems are useful for keeping snow from building up in your gutters and preventing ice dams.

Insulation Removal – Why You Should Leave it to the Pros

Insulation Removal Perth is a detailed process designed to enhance your home’s safety and energy efficiency. It involves assessing existing insulation and choosing the right materials for replacement.

Insulation

It also includes following specific guidelines for a safe work environment and proper disposal. It also requires the right equipment, such as a ladder, gloves, waste bags, and a utility knife.

The preparation process is essential to ensure safe insulation removal. The space must be clear of any objects and furnishings, allowing the worker to move freely without tripping or damaging items. Personal protective equipment must also be worn, including a respirator mask with a filter to prevent inhalation of fibers or dust, goggles to shield the eyes from debris, and gloves to protect hands. Coveralls can also help to minimize exposure to contaminants.

The type of insulation must be identified before beginning the removal process, as different types require different methods of removal. Fiberglass batts, for example, may release particles and require specialized vacuum equipment to remove. Loose-fill and spray foam insulation can be removed using a utility knife or hand tools, but they must be carefully handled to avoid damage to the underlying structure.

If the insulation is contaminated with mold, pest droppings, or other harmful substances, it must be removed and decontaminated to avoid spreading these materials into new areas of the building. This can be done by professionals, who use appropriate decontamination techniques and monitor air quality to ensure that no contaminants remain after the removal.

When removing insulation in an attic, it is important to turn off any electrical power sources to reduce the risk of shock or fire. It is also crucial to disconnect any light fixtures or junction boxes that might be present in the attic. Then, the insulation can be removed safely and efficiently.

It can take anywhere from six to 18 hours to remove insulation from an attic, depending on the size of the attic and the experience of the homeowner. The time can be shortened by having the necessary supplies, such as a shop vac, bags for disposal, and safety equipment.

It is recommended that homeowners replace their attic insulation every decade, or whenever it becomes damaged or contaminated. This can improve the energy efficiency of the building and decrease heating and cooling costs. In addition, new insulation can prevent heat from escaping the house in winter and prevent it from entering in summer, improving indoor comfort.

Removal

Insulation removal involves a meticulous process that requires special equipment and knowledge of safety techniques. It is a job best left to professionals, but homeowners who wish to do the work themselves can benefit from thorough preparation. This includes familiarizing themselves with different insulation types and conditions, as they will influence how the process unfolds.

Before the actual removal begins, it is essential to turn off any power sources in an attic space and disconnect any live wires. The dangers of electrical shock and fire hazards are significant, and this step significantly reduces them during the removal process.

Loose-fill insulation is typically vacuumed out with industrial equipment, and care must be taken around pipes and wires. It is also possible to use a hand tool to scrape or cut the insulation from surfaces, but this method can lead to contamination. The use of PPE is critical, including a dust mask or respirator, goggles, gloves, and coveralls. These protect the skin and eyes from irritation, prevent inhalation of particles, and keep contaminants off regular clothing.

After the insulation is removed, any leftover materials should be disposed of properly. They may contain harmful elements like asbestos or toxins, and they should be handled carefully. It is essential to follow local regulations regarding the disposal of hazardous waste, as this ensures the safety of the surrounding community.

In addition, removing old insulation can help identify and address other issues that might be present in the attic space. For example, if the attic is contaminated with rodents or pest infestations, this can cause health risks and create unpleasant odors in the home. The presence of mold, water damage, or other problems can also affect the attic environment and require additional repair or maintenance before new insulation can be installed.

Upgrading to higher R-value insulation can improve energy efficiency and lower heating and cooling costs, while improving indoor air quality. It can also enhance a home’s market value, as it presents a more comfortable and well-maintained property to prospective buyers. It can be especially helpful for older homes or those with poor energy efficiency, as the new insulation will offer improved occupant comfort levels and reduced utility bills.

Disposal

Insulation plays an important role in maintaining comfort and energy efficiency in homes, offices, and buildings. There may come a time when it is necessary to remove existing insulation, however, and this can be an involved process that should only be completed by a professional with the proper knowledge and equipment.

The most common methods of removal include vacuuming and manual removal. Vacuuming involves the use of specialized equipment to suck out loose fill or batt insulation, and it can be more efficient than manual removal for certain types of materials and conditions. In addition, the specialized equipment can help to minimize the spread of dust and debris during the removal process.

Manual removal is typically used for more firmly attached or difficult to reach insulation, such as that found in the corners of an attic. Additionally, it can be useful for removing certain types of contaminated insulation materials, including those that may contain asbestos. In such cases, it is essential to follow all local regulations for disposal to ensure that harmful substances do not contaminate the environment or public health.

Before beginning the removal process, it is important to understand that different types of insulation require a variety of preparation steps to ensure safety and effectiveness. For example, fiberglass batts, which are commonly installed in older homes, often contain asbestos, a material that can cause irritation to the eyes, nose, and lungs if it is released into the air during removal. In such cases, it is important to wear protective gear that includes gloves, a respirator mask, and goggles to prevent exposure to insulation fibers.

In addition, it is also advisable to have a ladder and plenty of garbage bags on hand as the removal process progresses. In some cases, it may be necessary to have a tarp placed on the floor to collect the old insulation as it is removed. Finally, it is important to have access to a powerful vacuum that can create high pressure jets of air to disperse and blow the insulation away from the attic.

In the case of non-hazardous insulation, it is generally safe to simply dispose of it in a dumpster. Using a container can save homeowners a great deal of money on disposal costs and ensure that their insulation is properly disposed of in accordance with environmental standards.

Assessment

Insulation removal is a complex process that should only be performed by trained and experienced professionals. It involves a thorough assessment of the existing insulation to determine its condition and identify any hazardous materials, like asbestos or vermiculite. It also requires specialized tools and equipment to ensure the safety of the homeowner and the crew working in the home. A professional assessment helps homeowners avoid costly mistakes and provides them with a better understanding of the best way to replace the old insulation with new, energy-efficient materials that will provide optimal comfort and value for their homes.

Inconsistent indoor temperatures can indicate aging or damaged insulation, which reduces its ability to perform its function. In addition, moisture is a common cause of insulation degradation and failure. It can enter the walls and attic through a variety of ways, including heavy rain without proper drainage, leaky roofs, and rodent infestations. It may even be present in the insulation itself, creating a breeding ground for mildew and mold. Insulation removal and replacement can help address these issues by addressing any moisture problems, eliminating pests, and choosing materials that are well-suited for the climate and structure of the home.

The assessment process starts with a visual examination of the insulation by a qualified professional. They will assess the situation to see if it is contaminated, damaged, or ineffective and recommend an appropriate action plan. They will also look for any issues that require attention or repair, such as rot or water damage, that should be addressed before replacing the insulation.

Residential insulation extraction services remove the contaminated, ineffective, or damaged insulation in attics and wall cavities to improve the efficiency of a home and lower energy bills. In addition, residential extraction services can assist with the preparation of an attic space for renovations and upgrades, as well as address pest infestations. Commercial insulation removal and installation services work closely with businesses to minimize disruption to daily operations, while ensuring the removal and replacement of any contaminated or damaged insulation. In addition, these services can help with energy efficiency improvements and compliance with environmental regulations for asbestos or vermiculite.

Why Choose Solar Companies?

Reputable solar manufacturers offer extensive product warranties and customer support. These warranties can last between 20 and 30 years and protect your investment over time.

Solar Companies

When solar panels convert sunlight into electricity, your home consumes less energy from the grid. This decrease in demand results in a lower utility bill, allowing homeowners to enjoy immediate savings. For homes that have a high electric usage, the payback period can be even shorter thanks to financial incentives that reduce upfront costs and/or shorten the length of your energy contract. Go to this website at https://www.ellingsonsolarmt.com to learn more.

In addition to saving money on electricity, going solar helps save money on maintenance and replacement parts. This allows customers to reinvest the money they’ve saved into other projects around their home, like energy efficiency upgrades or making that dream vacation a reality.

For businesses, using solar energy can also save money on operating expenses. This is especially true for businesses that operate during peak hours of electricity use. Additionally, using solar power can help businesses maintain a green and sustainable image that attracts customers and clients who care about these types of business practices.

The exact process and amount of money that you can save will vary depending on your electricity usage and the size of your solar system. However, on average, solar customers can expect to save $1,500 per year. This savings can be used to offset your electricity costs, reduce debt, increase your retirement or children’s college funds, or make a donation to that nonprofit you’ve always wanted to support.

Many states and local authorities offer financial incentives to encourage the use of solar power. These can include cash rebates, property tax exemptions, and performance-based incentives. These incentives can help you save on the cost of going solar and make it more financially feasible than ever to switch to renewable energy.

For homes and businesses that don’t want to install their own solar system, community solar is an option. With community solar, you can purchase electricity from a nearby solar farm that’s connected to your local power grid. When the system produces electricity, your utility company will credit your account with those credits. When it’s time to send you a new bill, your adjusted one will reflect the solar credits that have been applied to your account.

Reduce Your Carbon Footprint

Choosing solar is not only good for your wallet, but it’s also a great way to reduce your carbon footprint. In fact, it’s one of the best ways to fight climate change. Studies show that photovoltaic systems lower CO2 emissions significantly over their entire lifetime compared to fossil fuels, and they even make up for the energy it takes to manufacture them within just a few years.

Another thing to keep in mind when choosing a solar company is that they should be environmentally responsible. Look for a certified B Corp, which means that they are committed to climate justice with products and services designed for positive impact.

One example of a green business is First Solar. Their Ohio manufacturing facilities have been twice awarded platinum ratings in the Responsible Business Alliance’s intensive Validated Assessment Program (VAP). This certification demonstrates that the company is using sustainable energy, reducing greenhouse gas emissions, and working with partners who are doing the same.

If you want to go green, start by measuring your carbon footprint. There are many tools available to help you determine how much CO2 your business produces and what specific activities release the most. Once you know the numbers, you can start planning ways to decrease your footprint.

For example, if you have a large data center, consider moving to an electric vehicle (EV) charging station for your employees and contractors. This will not only cut your carbon footprint but it will also save you money on maintenance and operations costs.

Another option is to install a solar thermal system. These plants use sunlight to heat water for heating and cooling, which reduces the amount of energy required from fossil fuels. Additionally, they can be used to create a renewable-energy microgrid for a remote community, cutting electricity costs and lowering carbon emissions.

In addition, the federal Investment Tax Credit (ITC) is a big incentive for installing solar panels. This credit is worth up to 30 percent for residential, commercial, and utility-scale projects. You should consult with a qualified tax advisor before making any financial decisions.

Increase Your Property Value

Whether you’re considering selling your home in the near future or you plan to stay for decades, solar energy can help increase your property value. Studies show that homes with solar power sell faster and for a higher price than those without. In addition, solar can help reduce your energy bills and make your home more attractive to potential buyers.

The Location of the Solar Panels

As with any home improvement, the location of your solar panels will play a major role in their impact on your property value. This is especially true in sunny regions such as Denver, CO. However, even in less sun-friendly areas, a quality solar panel installation will still boost your property value.

In fact, a recent study conducted by Lawrence Berkeley National Laboratory found that homes with solar energy systems saw an average resale value increase of four percent. This is largely due to the fact that homebuyers are willing to pay more for a home with solar energy.

A solar system will not only save money on electricity costs, but it will also help protect homeowners against rising utility rates. This means that homeowners will see immediate savings and a greater return on their investment in the short term, while prospective buyers will be able to factor these benefits into their purchase price.

Furthermore, if you choose to install energy storage solutions like batteries, these can further enhance your solar system’s impact on your property’s value. This is because they will help you to stay resilient during outages and inclement weather, which can be a significant selling point for your property.

It’s important to note that these resale benefits will only be available if you own your solar energy system rather than leasing it. A leased solar system won’t be an attractive feature for potential buyers, and it will complicate the sale process. For this reason, we recommend choosing a reputable solar company to design a quality, scalable system that will be an asset when you are ready to sell your home. We can provide you with a free consultation to get started.

Increase Your Home Value

Homeowners who choose to invest in solar energy may be able to see increased property value at the time of sale. This is because potential homeowners will be more likely to pay for a home with lower energy bills, which can significantly reduce a homeowner’s monthly expenditures.

Many locations do not factor the value of a solar system into property taxes, which can make it even more attractive to prospective buyers. Additionally, a solar home is less likely to be negatively affected by changing energy prices, which can be especially important for homeowners in areas with volatile energy rates.

It is important to note that this property value increase only applies to homes that have fully owned solar energy systems. Leasing or PPA systems will not provide any additional value and, in fact, can actually complicate the process of selling a home. Fortunately, there are now numerous companies that offer cash and loan options for solar energy, which can allow homeowners to keep their solar energy systems even after they sell their home.

The best way to find out how much a solar system can add to the value of your home is to consult with a reputable solar installer. They can walk you through the benefits and costs of various options, so that you can make an informed decision that is right for you and your family.

There is a growing body of evidence that shows solar can increase a home’s value. For example, a recent study by Zillow found that homes with solar sold for 4.1% more than comparable homes without. This is a significant premium and can help cover the cost of the system.

As electricity and gas prices continue to rise, more and more homeowners are investing in solar power to save money on their energy bills. If you want to take advantage of this opportunity, contact the experts to learn more about how available incentives and tax credits can help pay for your clean energy project. We will also be able to assist you in finding an approved solar contractor to install your system, so that you can start enjoying the financial and environmental benefits of solar energy today.

The Importance of Roofing

Roofing is one of the most important aspects of a building. Without roofers, buildings would be susceptible to structural damage, water leaks, and compromised energy efficiency.

Roofing

Understanding the basics of roofing can empower homeowners, allowing them to make informed decisions when selecting materials and contractors for their projects. This guide will cover everything from the types of roofs to their maintenance requirements. Visit https://www.bostonroofingco.com/ to learn more.

Whether you’re building a new home or replacing an existing roof, choosing the right roofing material is a major decision that will impact the performance and value of your home. The type of material you select will depend on many factors, including your budget and location. Some materials are more expensive than others, while some can withstand harsh weather conditions better than others. A quality roofing material will protect your home from the elements and add to its resale value.

A popular choice for homes in warmer climates is clay tiles, which are made from earthen clays molded into rolled or interlocking shapes and fired for durability. They are a durable option for hot climates and can resist high winds, earthquakes, tornadoes, and hurricanes. The drawback to clay tiles is that they are quite heavy, and they require a strong structure to support them. They also become more fragile in cold weather and may need extra reinforcement.

Other types of roof materials include wood shingles and shakes, metal shingles and tiles, concrete shingles and tiles, and asphalt shingles. Asphalt shingles are the most common, as they’re affordable and easy to install. They can be prone to moss and mildew, however. Concrete shingles and tiles are an attractive, long-lasting option that adds a unique aesthetic to your home. They’re durable, aesthetically pleasing, and can withstand a variety of weather conditions.

Rolled roofing is a cost-effective and convenient option for low-sloped residential roofs and utilitarian structures such as sheds and garages. It’s available in a wide range of colors and finishes to suit any style.

There are also various roofing products that provide energy efficiency and other innovative features. Discuss the options with your contractor to find a product that best suits your needs and budget. New roofing materials also come with a manufacturer warranty, which can help reduce your repair and replacement costs in the future.

Installation

The roof is the main barrier between the interior of a building and the outside elements. It protects the space and its occupants from the elements, maintains a comfortable temperature, and prevents water damage to other parts of the structure. In order to properly function, the roof must be installed and maintained correctly. Roofing is a complex process that requires the use of specific tools and equipment, including hammers, nail guns, ladders, shingle cutters, hard hats, and harnesses for workers on taller jobs.

Before any work can begin on your roof, the contractor will prepare the area. This includes removing any existing materials and covering surrounding areas with tarps to protect them from falling debris. The team will also inspect the decking to make sure it is structurally sound and capable of supporting the new roofing.

Once the prep work is complete, the roofer will install underlayment and felt paper. The underlayment helps to keep the shingles secure, while the felt paper protects against water vapor that could otherwise get into the interior of your home. The shingles are then installed in rows, starting at the bottom of the roof and working towards the top. The shingles are nailed down using a specific pattern, with nails closer together near the edges and more spread out near the middle.

The shingles are then covered with flashing and drip edge flashing to protect the eaves, roof valleys, and ice and water sheathing. Flashing is also needed around chimneys, wood stove pipes, certain vents, and along hip roofs.

Maintenance

A roof is one of the most important components in any structure, protecting its inhabitants from harsh weather elements. It is also responsible for a building’s thermal comfort. To ensure the longevity of a roof, it is recommended that homeowners engage in preventive maintenance. By regularly inspecting the roof and addressing small problems, they can protect their investments and extend the lifespan of their homes.

Roof inspections should be performed on a regular basis, ideally twice per year (once in the spring and once in fall). These inspections should also be conducted following extreme weather events to detect any potential damage that may have occurred. This allows for timely repairs to be made, before the problem exacerbates.

When conducting a roof inspection, it is advisable to note any areas of excessive shingle wear and tear, as well as any shingles that are outright missing. Additionally, it is important to check for cracking and rusting of the flashing. It is critical that the flashing be properly caulked, so water does not seep into penetrations such as chimneys and vent pipes. It is also a good idea to inspect and re-caulk the flashing around skylights, exhaust fans and air conditioning units.

Additionally, it is a good idea to trim trees on the property that hang over the roof. This will reduce the chance of them contacting the roof in high winds and causing damage. It is also a good idea to perform a visual inspection of the entire roofing system, including soffit and fascia. This will help to prevent pests from accessing the interior of a home, and it will also allow for a quick detection of any wood rot or insect infestations.

Warranty

The warranty offered by a roofing company is a key consideration in your selection process. You should be sure to only work with contractors who are willing to guarantee their workmanship through a warranty. This will provide you with peace of mind should any problems arise after the installation is completed.

There are several different types of warranties available from shingle manufacturers and roofing contractors. You should be familiar with the terms of each type of warranty so that you can make an educated decision about which is right for your home.

Manufacturer warranties generally cover both the materials and the labor to install those materials. The manufacturer will replace or repair any defective products during a set warranty period, which may last up to 50 years for shingles and up to 25 for metal.

In addition, some manufacturers also offer a workmanship warranty that covers the labor required to repair or replace a roof. This is typically only available if you work with a roofing contractor who has been certified by the manufacturer to perform certain services.

It is important to keep in mind that a manufacturer warranty can be voided by the homeowner, which can be very frustrating. It is not uncommon to find that homeowners have unknowingly done something that will void the warranty, such as failing to schedule regular maintenance inspections or changing roof coverings without getting permission from the manufacturer.

There are also a number of other issues that can void the manufacturer warranty, including bringing in another contractor to perform repairs or replacing a roof with an inferior product. It is best to be aware of these potential issues so that you do not run into any problems down the road.

Whether or not you choose to purchase a roof warranty is a personal decision that depends on your budget and level of risk tolerance. However, you should never feel pressured by a roofing contractor to purchase a warranty if you are not comfortable with the terms.

Navigation